This page contains just the documentation, tips, and spoilers related to the non-standard† things that can happen on Must Test. For obvious reasons this page is never complete. You can check this page from month-to-month to see what has been added.
(† The standard here is assumed to be Minetest Game.)
Your starting equipment, the first time you join the server. If you lose these items while trying to get started, you can create a “rescue” account to get a new set.
Initial start items. From left to right, these are: Wooden Pick Cooked Mutton Torches Tinderbox Calendar Flint & Steel
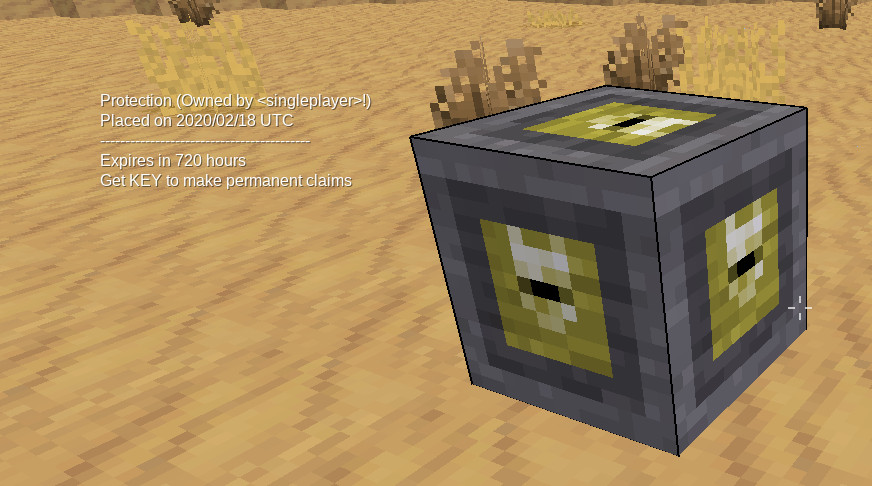
Note that basic protectors (as shown above) have an expiry timeout when placed, until you have obtained a Key of Citizenship.
Chat Commands
Useful chatcommands for players:
/info: Show the welcome formspec that’s shown to new players by default, which contains information about the server and provides some initial gameplay hints.
/status: Shows the server’s status information, which includes a link to this website. This is what is shown to new players who join the server. Returning players are shown a welcome-back message instead.
/players: Shows the number of players currently on the server and a list of names. If you are in a group PM channel (see /channel & /x) then you’ll also see the list of players currently in that channel.
/spawn: Lets new players get out of traps and pits near the spawn area. This only works in close proximity to wherever the current spawn area is (the spawn location changes). Obviously this will not work if the player is in jail, or if they are already too close to the current spawn location.
/recall: This is basically the same as above.
/time: Get the current time of day, in 24-hour format.
/days: Get the number of days and the current calendar date. Note that the server’s concept of dates is different from realtime; in particular, the server’s “year” is longer than the real year.
/mapfix: Updates liquid and lighting in an area. Use this if for some reason there is a lighting issue on the map, or if water/lava is refusing to flow normally.
/shout: Say something very loudly (chat will show up in red). You can also shout by prepending your chat with !, like this: !I want itooms. Give me itooms!
/whoami: Have the server tell you your login name. (Your login name can potentially be different from your display name that is shown in chat and other places.)
/channel: Set which group PM channel you wish to be on. Pass a single argument, the name of the channel (must contain only alphanumeric characters or underscores). Pass no argument to remove yourself from the channel.
/x: Send chat to everyone currently on the same group PM channel as you.
/r: send a reply (via PM) to the person who last sent you a PM. Useful if you do not want to bother typing the recipient’s name.
/afk: Query whether another player is currently AFK, or toggle your own AFK status. AFK stands for “Away From Keyboard”.
Common commands that behave the same as in other servers are generally not listed here.
Key of Citizenship
These examples of strange technology were discovered inside various underground caches by colonists shortly after their arrival on the surface of the ice world. Early on, the objects were named “Proof of Citizenship” because the colonial government treated possession of such a device as evidence that a miner or farmer had the minimum skills required to survive in this harsh world. Eventually, posession came to be viewed as a privilege, and the acronym PoC became its common name among old-time colonists.
As time went on, the devices were shown to be concealing arcane abilities. Most of their currently-known functions, including a transportation and communication system, were discovered through the effort and crude experimentation of early pioneers. These people worked under the assumption that the device had to have some unique purpose other than being a highly reflective, strangely-humming paper-weight. As a result of their archaeological work, most of the devices’ functions have been decrypted and are now accessible to their possessors.
Since then, the technology has been successfully duplicated by engineers. Its construction blueprint is known, though the means of operation are not wholly understood.
The Key. Slightly weighty for its relatively small size (fits on the wrist). Surface is engraved, and made of a material that is not quite stone, not quite metal. Constructed versions feature a speaker for communication and status lights.Regular interface to the Key.
Excess player accounts on this server are purged weekly, every Sunday at 06:00:00 UTC, when the server restarts (the server’s maps are also generated at this time). This purge is necessary to prevent the database(s) from becoming bloated with information from players who join and then leave. When accounts are purged, players who do not have a Proof of Citizenship or Key of Citizenship in their main inventory will lose their data; including inventory, name, password, and location in the world.
Craft recipe to make the initial Proof of Citizenship (PoC). You can also check the craft-guide in-game to see how to make one.
New players should craft this item as quickly as possible, if they plan to play for long. However, if you cannot craft one, you can save your items in a chest in the world, as that will not be deleted. Be warned though: if your account is removed, anyone can log on using the name you chose and steal your materials/claim your work.
Once you have obtained the PoC, you must be sure to always keep it in your inventory. Later when you have obtained more advanced materials, you can upgrade the PoC to a Key of Citizenship (as described in italics above). The KoC has additional functionality, so it does not take up inventory space pointlessly. Access its interface by wielding it and ‘punching’.
As long as you have a Proof of Citizenship or Key of Citizenship in your main inventory, your account is considered to be registered. If you decide you no longer want to play on the server, you can unregister by removing the PoC (or KoC) from your inventory and waiting until 06:00:00 UTC of next Sunday. Be warned however, that this action is permanent; if you change your mind and want to come back, you will have to start over. There are no account restorations.
Marker System
The marker system is accessed through the Key’s interface. Your Key has the ability to store and display the locations of markers that you can place (or “drop”) in the environment. These markers are visible only to you, but you can send copies of your marker lists to other players if you want. To send a marker list to another person’s Key, you need to be close to them; the ability of the Key to transfer marker information is limited to a short distance.
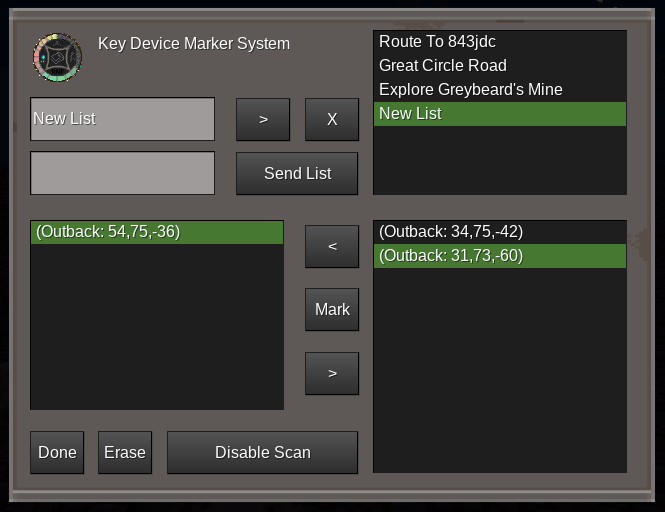
Each Key can store multiple marker lists, and each list can store multiple markers (up to about a hundred). Markers are only visible when you are closer than 60 meters to the location of a marker. Typical usage is to place multiple markers like breadcrumbs while exploring caverns, which can allow you to find your way back to your starting point. Or you could place markers at the locations where you’ve discovered valuable ores, in order to map out a mining region.
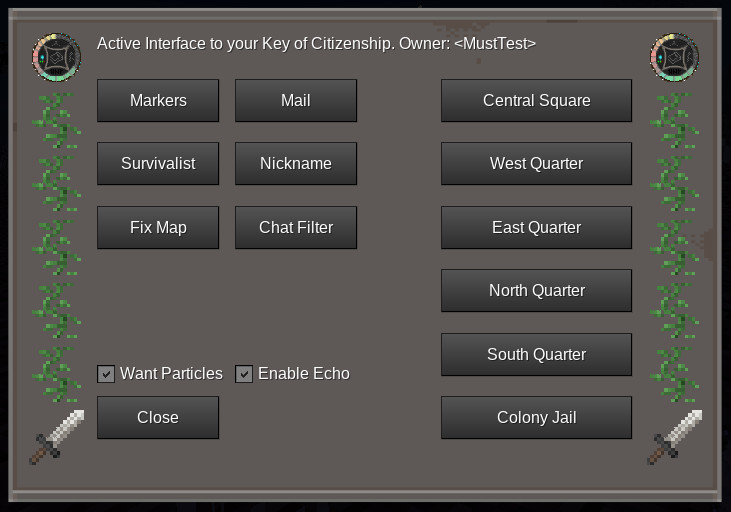
Marker System Formspec.
The marker system’s formspec has 3 major parts. In the top-right is a list of your created marker lists (to the left of that are buttons to create and delete lists, and a button to send a selected marker list to another person’s Key). In the bottom-left is a list of all markers you’ve dropped which are currently “unattached” to any list. Unattached markers are not visible in the world, you must first attach them to a list, then select the list for display. In the bottom-right is the list of all markers that belong to the currently-selected list.
Between the bottom left and right lists are three buttons. You use these to “drop” markers and to move them between the unattached list and the currently-selected list. Whenever you drop a marker, it is placed in the unattached list, so you need to select the list you want to move it to first, then hit the appropriate move button.
Underneath the list of unattached markers is a button to erase a selected marker (an individual marker, not the whole list). You can only erase unattached markers, so if you want to erase a marker that was added to a list, you must detach that marker from its list first, using the appropriate move button.
The most important button on the interface is a toggle, named either “Disable Scan” or “Enable Scan”. You need to select a marker list (by clicking its name in the upper-right), then enable the marker scan, in order to see your markers in the world. You can only show the set of markers from one marker list at a time in the world.
A marker location shown in the world.Closeup of a marker location.
Tip: you can access this formspec directly by sneak-punching while wielding your Key. This bypasses the Key’s normal interface.
Key Mail System
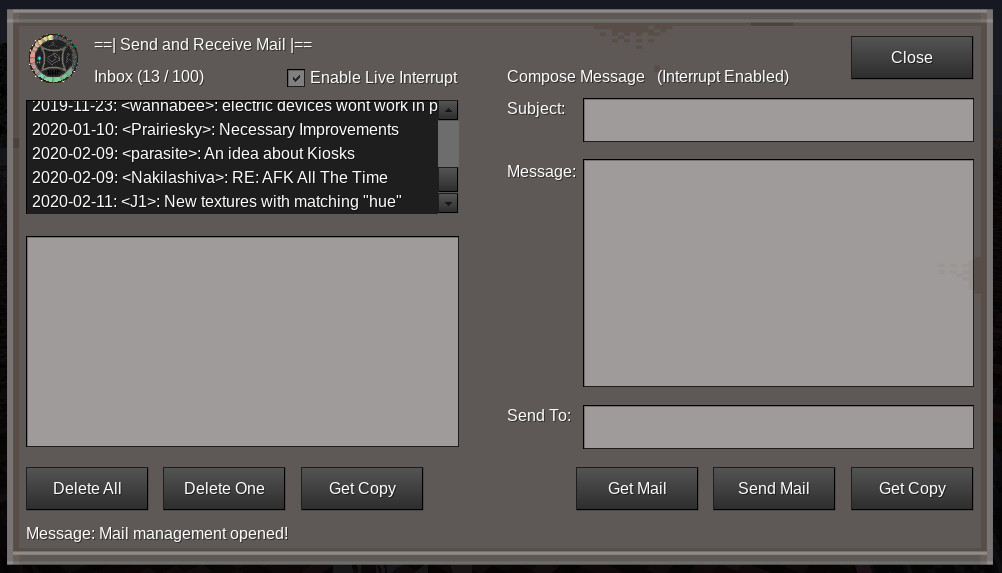
Once you have obtained your Key, you get access to the in-game mail formspec. This allows you to receive mail from other players, and send mail to others, even while they’re offline. Features include the ability to get copies of your mail on paper (you need paper in your inventory, and some empty slots), and the ability to quickly reply to a message while it is displayed in the left-hand panel. To queue up a reply to a specific message, you can double-click on the message entry in the upper-left list. The subject and recipient fields will be filled out automatically.
You can send mail to multiple recipients at once by separating names with commas in the “Send To” field.
In-game mail formspec.
The maximum size of your inbox is 100 messages.
Tip: you can access this formspec directly by holding 'E' while you punch with the wielded Key. This bypasses the Key’s normal interface.
Trade & Vending
This server includes vending machines which allow players to buy and sell items for minegeld (MG). Several denominations of minegeld exist, from 1 MG notes to 100 MG notes. Vending works here more or less the same way the regular vending mod works: place a locked chest with the item(s) you wish to sell, place a vending machine on top, and then configure the machine. Depositors are available, too.
An important difference from the stock vending mod is that vending machines here deal in minegeld (currency), not gold ingots (or another similar item). Since currency is fungible, and there are multiple items in the game representing the same currency, the vending code had to be adapted to work with it. You’ll want to take care when configuring a vending machine that the price you set is the price you intended to set, because the stock interface (optimized for items, not currency) is still used.
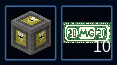
Currency denominations. From left to right, these are: 1 MG Note 2 MG Note 5 MG Note 10 MG Note 20 MG Note 50 MG Note 100 MG Note
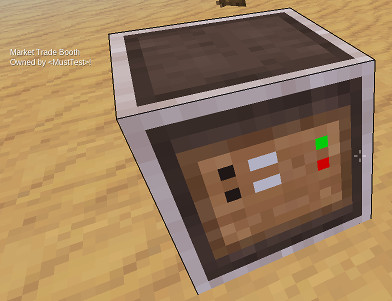
In addition to the usual vending and depositing machines, you can construct a trading kiosk. This serves dual-purpose; it can be used simply as a way to advertise the presence of a location (such as a good mine or cool build), or—and primarily—as a means to buy and sell stuff over long distances without having to travel to the physical locations of shops. Since shops from different players may be scattered over large distances, this is a very important feature.
Trading kiosk.Trading kiosk formspec (main).
If you have built a shop, you most likely want to add a trading kiosk to it, as otherwise all your customers will have to physically travel to your location in order to buy or sell anything. The trading kiosk’s formspec has a bunch of tooltips which hint at the correct way to set up the machine.
The following instructions explain very briefly how to correctly set up a trading kiosk (be sure to read all the formspec tooltips):
1st, craft, place and configure your locked chests and vending/depositing machines as you normally would. You should place them near each other in a small area. This is because the trading kiosk will link to nearby vending/depositing machines that you own, and it won’t find any shops that are too far away. The range is about 15 meters around the trading kiosk.
2nd, open your trading kiosk’s formspec and head to the inventory. Press the button to mark this trading kiosk as your “delivery/retrieval location”. Only one of your trading kiosks (if you built more than one) can be your delivery location at a time, but you can freely change it.
3rd and finally, create an advertisement (costs a small amount of MG) which allows others to see your trading kiosk on the network. If there are any trading kiosks made by other players within range of the machine, you’ll be able to see their advertisements, too. (This step is optional. It is only needed if you intend to create your own shop, not if you simply want to buy and sell at someone else’s shop.)
Assuming you’ve correctly set up your trading kiosk, and you have perhaps discovered someone else’s (correctly configured!) trade kiosk in range of yours, here is how you can buy or sell:
To buy: place your minegeld in your trading kiosk’s inventory. Hit the back button, select the item you want to purchase (on the right-side panel) and press the Buy button. The cost will be subtracted from the minegeld in your trading kiosk’s inventory, and your purchased item will be placed in the same location (your kiosk’s inventory). (Note to seller: The purchased item is removed from the chest that is associated with your linked vending machine, and your payment in minegeld is sent to your trading kiosk. Thus, as a seller, in order to allow others to buy your stuff remotely, you need to have marked your trade kiosk as your delivery location.)
To sell (or deposit): place the item you want to sell in your trading kiosk’s inventory. Then select the correct depositing machine listed in the right-side panel (just as if you were going to buy an item). Then hit the Deposit button. The item you’ve sold will be removed from your trading kiosk’s inventory, and the minegeld you receive in payment will be sent to your kiosk’s inventory in place of it. (Note to buyer: the deposited item is sent to your trading kiosk. The minegeld payment comes from the chest that is associated with your depositing machine, and is sent to the kiosk that belongs to the player performing the deposit. Thus, as the owner of a depositing machine, in order to allow others to deposit items remotely, you need to have marked your trade kiosk as your delivery location.)
Important notice: when buying or selling at a shop directly, you are strongly advised to keep at least a few empty inventory slots in order to receive minegeld payments, or to serve as a “scratch space” for (re)composing currency denominations into smaller or larger bank-notes.
Beds
Sleep in a bed (while it is night) to set your respawn position. Take care to do this every so often, because you can only respawn a limited number of times (without sleeping) before your respawn position will be lost! Once your respawn position is lost (or you’ve lost your bed some other way) then the next time you die, you’ll respawn in the Outback as if you were a new player. Frustrating!
You may want, sometimes, to move your respawn location from one bed to another. If you only have one bed and you have to travel any distance between your old house and your new one, this can be a perilous activity, since you might die during the operation. The safe way to move your respawn location is to craft, place and sleep in your new bed before you dig your old bed (if you intend to dig your old bed). This way, you don’t lose your respawn position if you dig your old bed. You should also be sure that your bed is protected by a protection block, so no one else (or a mob, or lava) can ruin it.
If another player kills you outside of an area marked as part of a town or city, then you will lose your bed’s respawn position in that case, too, and you’ll be sent back to the Outback. To avoid this gruesome and horrible fate, build some city blocks and place them in the areas that you frequently travel in, especially if you tend to meet other adventurers in those areas. As long as you have at least one respawn left for your bed, then if you get killed in a city area, you’ll respawn in your bed instead of somewhere else.
Ore Distribution Hint
The ore generation algorithm has been significantly changed from what players are probably used to on most servers. Instead of being generated uniformly and at predictable depths, each ore is generated using a pattern of a 3D “map” (like Swiss Cheese) which determines where it spawns. Depth is still important (dig below -1024 to find mese blocks), but each ore now generates regionally.
Thus you can find, for example, iron in one mine but no copper, and in another mine, copper can be found but no iron. This method of ore generation is used to avoid the problem of “rainbow caves”, in which players commonly find most ore types just by exploring a single cave. The high number of ore types spotting the walls are what give mines a rainbow appearance.
There are several ore types added on top of the default ores. On average each cave in this world will have only 2 or 3 ore types at once, though it is possible to get lucky and find a good mine with as many as 7 ores available at once. Alternately, you may be very unlucky and find a region with no ores at all!
You will need to mine in several caves at once in order to get a decent variety of ore types. TNT-mining is expected and encouraged. Some ores cannot be found near the city at all, necessitating distant exploration in order to find regions where they spawn. It’s best to plan your exploration to take place during the Season of Stone, when travel is easy and ores can be spotted quickly due to not being hidden beneath the snow.
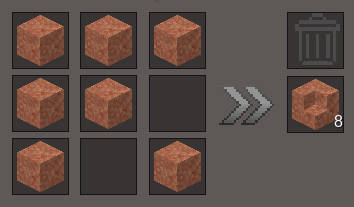
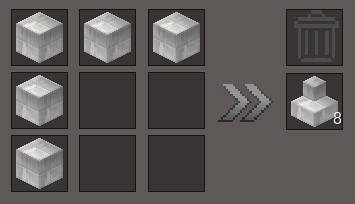
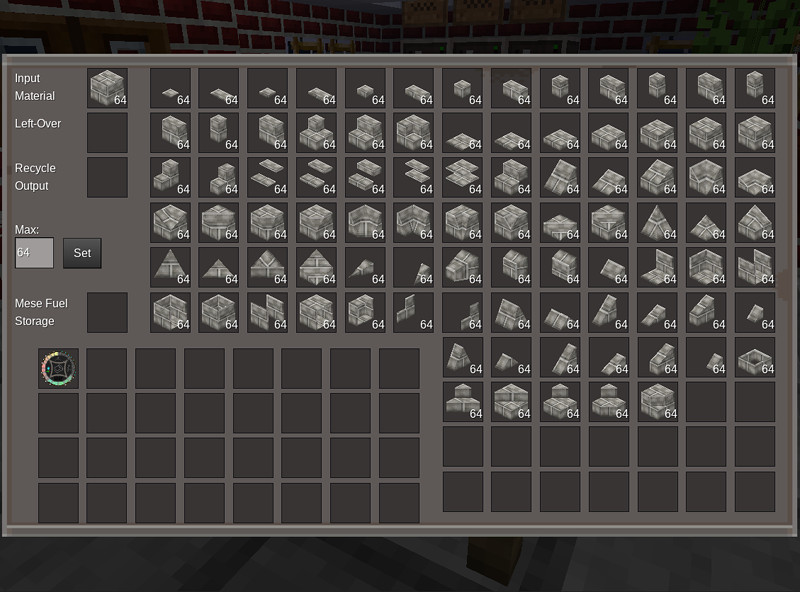
Available Table Saw Shapes
You can craft stairs and slabs in your inventory’s craft-grid, and using additional equipment (and mese fragments) you can saw and cut full blocks into slopes and microblocks.
Cuts blocks into smaller bits. Keep away from children!
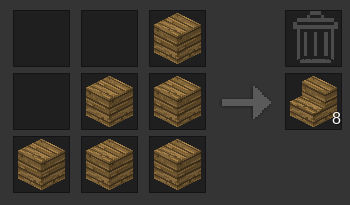
Here’s the recipe pattern you use to craft stairs of any type. Some people are used to a flipped recipe, but that won’t work here.
This is the pattern used to craft stairs. Note that the reverse (or flipped) version of this recipe pattern is not provided. Watch out for the trash slot!
Crafting recipes for inner and outer corner stairs are available without having to use a table saw:
The crafting recipe for inner corner stairs.How to make outer corner stairs.
Here’s formspec screenshot showing the available block shapes (2020/2/9). Note that the circular saw uses mese fragments to power it (see the single inventory slot on the left, right above the player’s main inventory). The cost in mese fragments is related to the number and type of the shape you wish to cut. New shapes are added on occasion, so this screenshot probably won’t show everything by the time you see it.
Whenever a new shape is added, old table saws might not provide it until you dig and replace them, to “reset” the tool.
Circular saw formspec.
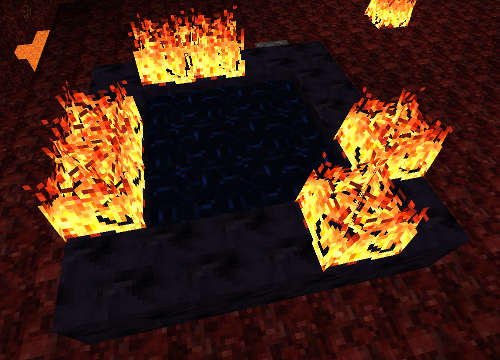
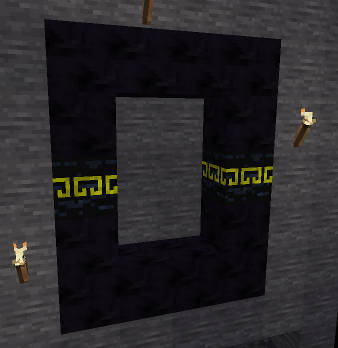
The Flameportal
The fastest way into the Nether.
The Flameportal can be built with 12 or 16 Obsidian (the corners are strictly optional and not needed). You must build it 5 meters long and 5 meters wide, with a 3x3 hole in the middle containing only air.
To activate, stand clear of the portal and strike it with a flint & steel. Once the portal is activated you may stand on any part of the Void and strike the portal again with the flint & steel to be teleported into the Nether. Each Flameportal can link to up to 5 random locations in the Nether. The precise location to which you’ll be teleported depends on where on the Void you stand.
You must be sure to bring enough materials with you to build another Flameportal in the Nether, otherwise you will be trapped! When you use a Flameportal the server builds a landing platform for you (to prevent players from landing in the Brimstone Ocean), but it does not build a return portal.
A return portal is built exactly the same way you build a Flameportal outside the Nether, except that its location in the Nether causes it to ‘return’ you to the last Flameportal you used that was outside the Nether, instead of teleporting you to a new location in the Nether. This means that any Flameportal you find in the Nether, built by anyone, is always a return portal.
An operational Flameportal built in the Nether. This one uses 16 Obsidian, but you can also build them with just 12 Obsidian since the corners are not required. Since this Flameportal is built in the Nether, it is a return portal, not a Nether portal.
The recommended practice after entering the Nether is to immediately build a bunker around your portal and protect it. Dungeon Masters will plague you mercilessly until you are fortified with walls. If you are slain in the Nether and have not used a Bed, you’ll respawn in the City of Fire instead of on the surface. There is a Full Spectrum Teleport in the City of Fire that you can use to get back to the surface.
You cannot build a Flameportal out of Dead Obsidian.
The flames that appear on top of a Flameportal are part of the portal, and removing them will deactivate your portal. It is possible to build a Flameportal that does not spawn flames on the obsidian surface by covering the top of the obsidian with another material prior to activating the portal. After the portal is activated you can freely remove the covering material.
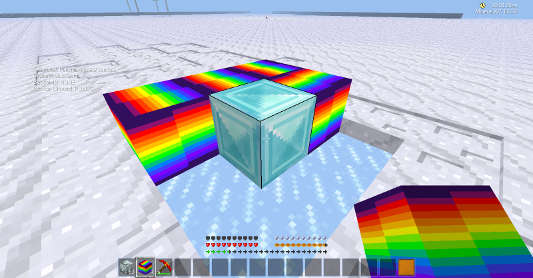
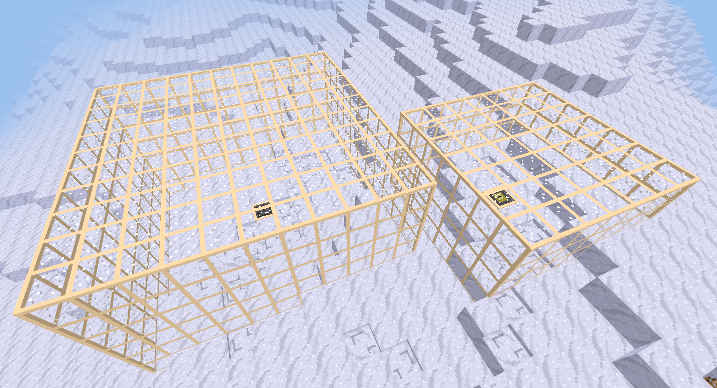
Diamond Teleports
This is the most complex type of teleport you can build. Here is a visual introduction to the construction of this machine.
Please pay attention to the following WARNING before building one of these devices! Whenever someone transports from another location onto one of these teleports, the machine destroys anything in the 3x3x3 area directly above it, including locked chests and irrespective of protection! Sometimes destroyed materials turn into fire; you can use any material you don’t care about to test and find the precise region that is affected. This goes for players, too. Anyone unlucky enough to be standing on (or next to) a teleport when someone else transports in will be slain! Player’s bones are the only thing that will not be destroyed.
When using a chain of teleports with a buddy, the recommended practice is to communicate your status to your friend before and after using the teleport. Some people have adopted the system of saying ‘Clear!’ in chat to indicate to someone else that it is safe for them to use a teleport, and ‘Clear?’ to ask if someone else is away from danger. A good rule of thumb is to step away from the teleport immediately after using it. You are safe as long as you are not standing on the 3x3 teleport pad.
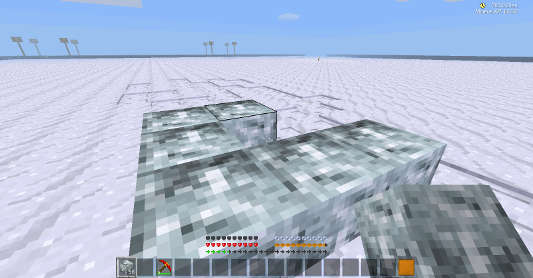
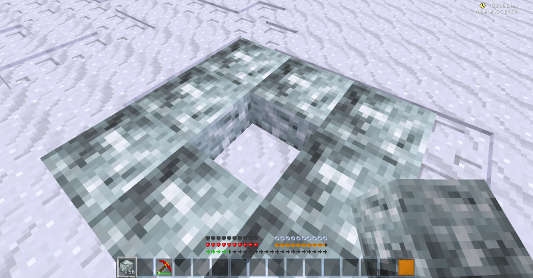
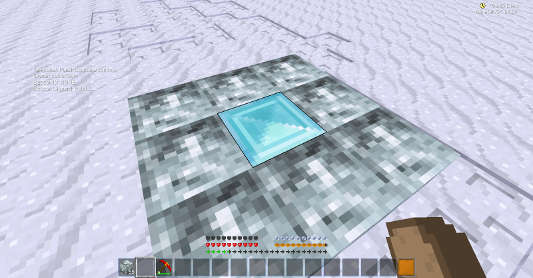
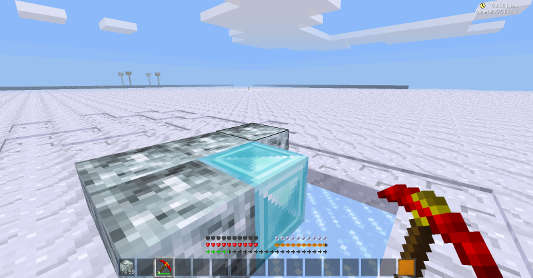
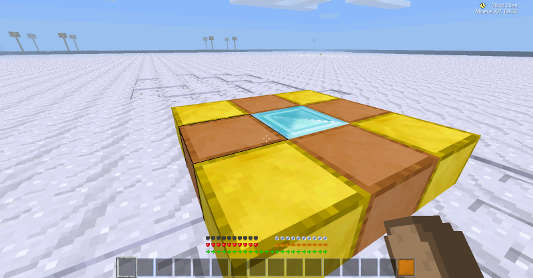
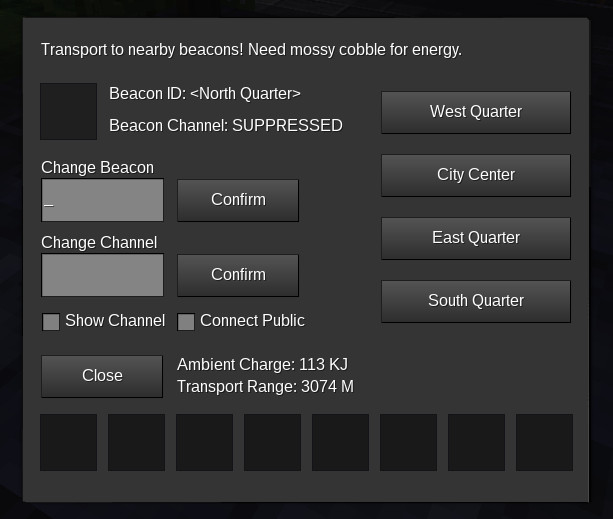
You’ll need at least 9 Diamond Blocks to start with. Begin by placing 8 in a square ring. Don’t forget to protect the area!The 9th Diamond Block must be placed last, in the center. The hole should be empty, first; here there is some snow in the way.If you placed the Diamond Blocks in the right order, the center block will transform into a teleport machine. This shows a completed Diamond Block Teleport. On the snowy surface it has a range of ~3,000 meters. Note that with most configurations, range is reduced the farther underground the teleport is.To configure your teleport with something other than Diamond Blocks, you’ll need to first dig the diamonds. Be careful not to dig the teleport itself. If you do dig the teleport machine it will self-destruct. You will get 8 diamonds back, 1 diamond short of a block.Next, place your desired configuring blocks around the teleport. Most metal blocks work (gold, iron, mithril, etc.). You can generally mix and match metals in order to adjust your teleport to a desired range. Rainbows give the most range, but are not metalic and cannot be mixed with metal blocks.A completed Full Spectrum Teleport. It has a range of 7,770 meters, even in the Nether. Unlike every other teleport configuration, it does not require Mossy Cobble or Lilypads to use. It drains zero-point energy from its environment.This teleport is configured with gold and copper blocks. Its range on the surface is around 600 meters.This is the teleport interface formspec as of November 7, 2017. It has undergone a few revisions in the past. The 8 inventory slots at the bottom are the player’s hotbar. The single inventory slot in the top-left is the fuel slot. You put Mossy Cobble or Lilypads here.
Obsidian Gate
A device similar to the Cursed World Gates on the just test server. There are important differences however. Every gate has an owner to which it is bound the first time someone uses a gate. If the wrong person uses a gate, the person will be transported and the gate will be griefed with fire or lava (it will not, however, be destroyed). The proper owner of a gate can take others through with him or her; to transport others they must stand close to the person who activates the gate.
You can prevent others from using (and thereby griefing) your gates by placing an obstruction (like a torch) inside the gateway. This prevents the gate from being activated. Obviously your gate must be protected, otherwise the person trying to use your gate can simply remove the obstruction.
Note that underground gasses count as an obstruction.
The best use of these gates is for mining and underground exploration. A gate will transport its user to a random location that is no farther than 5,000 meters from the user’s original position and no closer than 500 meters. You can chain multiple gates together and thus travel great distances, but never in a controled direction.
A hidden gateway built into a rockface.
How to construct: you need 12 blocks of Obsidian or Dead Obsidian, and 2 Cursed Stones. The gateway itself shall be 4 meters wide and 5 meters high, with a doorway in the center 2 meters wide and 3 meters high. This doorway must contain nothing but air! You can put the Cursed Stones anywhere in the construction but there must always be exactly two. Note that the gate may be part of any larger obsidian structure, including another gate, as long as the structure described here can be found when you attempt to activate the portal.
How to activate: stand inside the gate and strike the obsidian or one of the cursed stones with a flint & steel. The first time you use a gate it may take a while because the server is locating and building a return gate which you can use to return to the first gate you built. Once you are through, do not allow your return gate to be destroyed. If it is destroyed you will not be able to rebuild it, and you will likely be trapped.
Protection & Protectors
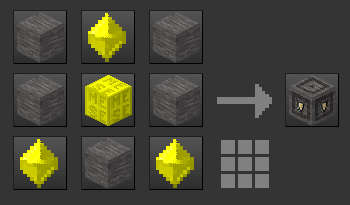
This server uses protection blocks, not areas, to define protected zones. You can craft these blocks in two basic tiers. The first tier protects a 7x7x7 area per block, and the second will protect an 11x11x11 area per block. The crafting recipes were carefully designed to have the roughly same cost in mese when protecting some amount of land, regardless of the tier you use.
Crafting recipe for the second-tier 11x11x11 protector. Note the cost: 12 mese crystals.Crafting recipe for the first-tier 7x7x7 protector. The cost per protector is 4 mese crystals.
That being said, there are advantages to each tier. 7x7x7 protectors are advantaged when protecting roads or long strips, as it will cost less mese per protection-block to protect the road. When protecting large cubic areas, however, 11x11x11 protectors are advantaged, costing slightly less mese per node protected than if you had used first-tier protectors. They are also advantaged in that they interfere less with structure design, since fewer of them are needed.
Players are strongly advised to protect all their structures. Except for snow as noted below, much effort has gone into the game code to ensure that no known ways to bypass protection exist. Fire, for instance, burns things, but will not burn things in protected areas. If you do find a way to bypass someone’s protection aside from snow, please send me a message in-game so that I can fix it, and thank you!
A size comparison of protectors. The one on the left is an 11x11x11 protector, the one on the right is 7x7x7. Each of the grid squares is 1 node. Image 2017/12/3. Server is currently in the dead of winter.
As far as protection goes on Must Test, snow can be dug and placed everywhere, regardless of protection. Nodes which have this property (like snow) can be said to have protection bypass. Some very few nodes can be placed in others’ protected areas, but not dug, such as memorandum that you make with paper. In addition, nodes which have fallen universally cannot be protected; that is, anyone can dig a fallen node, even if it has landed in someone else’s protected area. This is a very useful feature for roads, etc., because it effectively prevents the griefing of roads such that other players cannot pass. Also, protectors defend nodes which are normally breakable by falling nodes (sometimes called dirt-bombing). On some survival servers it is common to see surface-level gardens covered by glass shielding. That level of defense is not needed here. It is still needed underground, where there is the threat of lava. For performance reasons lava does not respect protection. However, lava is not permitted to exist on the snowy land surface.
See below for a note on protectors placed by newbies.
A basic protector showing an expiry timeout.
When you first start playing on this server, any 7x7x7 (a.k.a. basic) protectors that you place will have an expiry timeout equal to about 30 realtime days (one month). You can place a permanent protector in one of two ways; either by being the owner of a Key of Citizenship, or by using the advanced (11x11x11) protectors, which never expire, regardless of whether the player who placed them has a Key.
The motivating factor for having this limiting feature is to prevent the protectors placed by new players from locking up land that other players may want to use, if those new players do not eventually return to the server to replace their temporary protectors with permanent ones.
Digging and replacing the protector will of course reset the expiry time.
A temporary basic protector behaves exactly like a permanent basic protector in all other respects.
City Block
A city block. Use this to mark a location as part of the city.
While the protector blocks are used to prevent property griefing, you should also consider placing city blocks in your owned areas. City blocks discourage unlawful behavior near them and send offenders to jail if they get caught. They forbid the use of TNT anywhere nearby, and they block ore leeching operations anywhere within a whopping 100 meters cubic-radius. They’re also needed if you want to kick someone out of your house for trespassing.
However, the single most important feature of the city block is that if you are killed (by another player) in an area marked by one, then you do not lose your bed’s respawn position. You will lose your bed’s respawn position if someone kills you anywhere else. So don’t skimp on placing city blocks!
City blocks do not have owners, and you can rely on city blocks placed by others to save your bed’s respawn position (as long as they aren’t removed, of course).
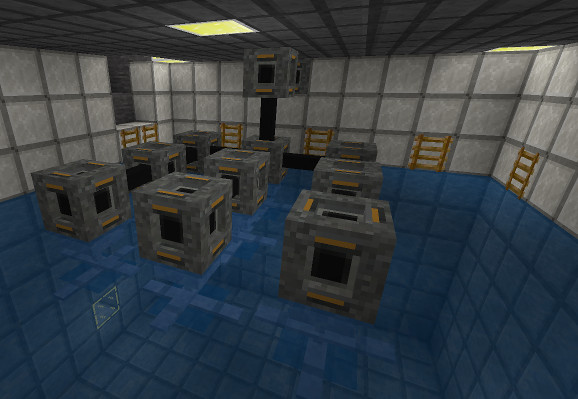
Technic Introduction
This server uses a custom version of the Technic mod that is found on other servers. While the custom version used on this server is similar in many ways to the original Technic mod, it also has some very important differences that will surprise and perhaps disappoint players who are used to (and expect) the original Technic. This documentation is designed to highlight the major differences; it is expected that players who play with the machines on this server probably already have experience with the official Technic mod on other servers. Therefore, there will not be much explanation about things that are generally the same.
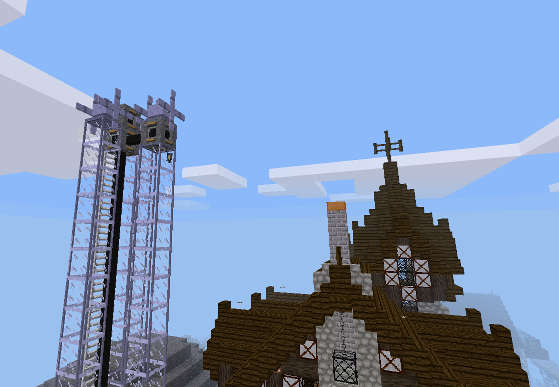
A windcatcher near a Gothic house.A machine work-shop owned by Zero and DragonsVolcanoDance.
The first and most obvious difference that veteran Technic users will notice is that machines on this server do NOT run when you are away from where the machine is located. In the original Technic, it was possible to set up your power-network so that it would run even when you were not near the machines. While this is certainly a desirable feature, the realities of server hardware require a different paradigm. Over time, a server with the Technic mod will begin to lag, as players build power-networks of ever-increasing size and complexity. Eventually, if nothing is done to halt this network-building, the server will become nearly unplayable.
This server solves the problem by not permitting it to exist in the first place. You can still build huge, sprawling power networks, but machines will not run if you are not near them; this means your network is effectively “sharded”; if a network is too big for every part to be active at once, then only the part near a player will consume any server resources.
Another, subtle difference that ought not go unmentioned is that all machines and cable boxes are owned by the player who placed them. (This ownership fact is not revealed in any obvious way in-game.) Networks built by different players will not automatically connect to one other, thus retarding the rate at which players can build and join networks together. A special machine is provided for connecting networks that were built by different players. While not obvious from a user’s perspective, this deliberate design choice forces networks to be still further sharded, resulting in less CPU being required to process them.
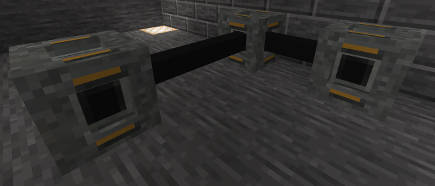
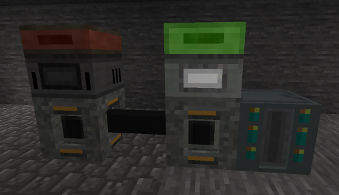
Cabling also works differently. Here, cables cannot turn corners. In order to turn a corner, a cable box is provided, which you should place at the corner where you want the cable to change direction. This rule reduces the amount of resources required to traverse the network, since the server can now rely on cables going in fixed directions, with change in direction permitted only at cable boxes. There are three cable box tiers to match the three tiers of cable. Also, cables do NOT connect directly to machines, only to cable boxes. This is an odd restriction, admittedly, but it helps reduce the complexity of network traversal.
You need cable boxes to turn corners.
Here’s something that won’t work, rather unintuitively.
Cables connect to cable boxes. Cable boxes can connect directly to other cable boxes. Machines connect to cable boxes and cable boxes connect to machines. But a cable cannot connect directly to a machine.
The next major difference is EU buffering. It is implemented purely as a performance optimization, and you can generally ignore it (although the little energy balls in the machine formspecs do look pretty). Buffering simply means that power does not flow through the network in a “continuous” circuit-like fashion (as the original Technic tries to simulate). Instead, machines (both generators and tools) buffer the energy they use/produce, and send that energy over the power-network to other machines only when the buffer capacity is exceeded. This greatly reduces the number of network traversals the server has to do.
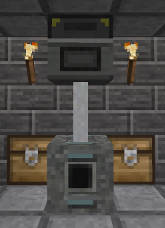
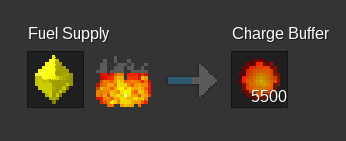
A fuel-generator formspec, showing EUs being buffered in the slot to the right. No, you can’t remove them manually. You’d electrocute yourself. :-) In this instance mese is being used for fuel. You can also use coal or kalite. The generator will not send the buffered EUs to a battery box until the buffer reaches 10,000 EUs (the capacity of the MV fuel-fired generator). If there is no battery box on the network, excess energy will be wasted.
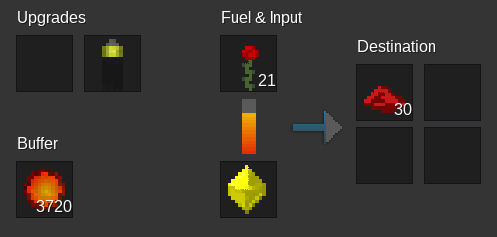
Here is the formspec of an operating MV extractor. You can see here that it is not strictly necessary to have your machine connected to a network. Most machines have a built-in fuel-fired furnace, which allows them to produce energy from fuel placed directly in the machine. It is less efficient than a dedicated fuel-fired generator, though, and the only fuel a built-in generator can burn is mese.
Notice the buffered EUs in the slot to the left. If the machine was connected to a network, it would consume the energy there before looking on the network for more energy.
An MV extractor using its built-in fuel-fired furnace to produce energy needed to extract dye from roses. The battery upgrade reduces the amount of power needed for the extraction, effectively increasing the apparent efficiency of the built-in generator by a slight amount.
The last major difference is “machine stand-by mode”. This is the default behavior of every machine, and every machine tries to re-enter this mode after it is disturbed and forced into an active state. Once a machine has entered stand-by mode, it can take serveral minutes for it to wake up again, or notice any change in the environment or the power-network. When a machine is in stand-by mode, it requires very little server resources, hence the reason for using this implementation.
The behavior is particularly noticeable with machines that you would normally think of as continuously operating, like windcatchers or geothermal generators. Stand-by mode can be quite frustrating and somewhat mystifying if you are not aware of why it happens.
If you are not sure whether a machine should be in stand-by mode, or if you are impatient and want to wake the sluggard up in a hurry, you can punch the machine to wake it up immediately. If it doesn’t wake up, there is probably a good reason for that. Your power-network may be misconfigured, or perhaps there is nothing for the machine to do.
A generator, for instance, will enter stand-by mode once all the batteries on a network are full; this is because any additional energy it would produce would be wasted (it would also be a waste of server resources to run the machine). (If there are no batteries on the network, or the generator is not connected to a network at all, then the generator will enter stand-by mode once its own internal buffer is full.) If the batteries on that network are then drained, it will take the generator some time to notice and begin producing energy again. The amount of time it takes the generator to wake up may be several minutes. Punching the generator will wake it up immediately.
A tool machine has similar behavior. A furnace, for example, will halt if it needs to get more energy from the power-network for smelting, but the network has no available energy. In that case the furnace will enter stand-by mode. In the meantime you may have a generator on the network producing energy. The furnace will not detect that more energy is available until it wakes up again, several minutes later.
The canonical solution to the problem of stand-by mode is to ensure that your power-network has enough battery boxes, that when using tools, your batteries do not drain completely before the generators on your network wake up and begin generating more energy.
Some effort has gone into ensuring that it is not possible to build a self-activating power-network. Without player intervention, every machine will eventually halt, thus freeing server resources.
There are quite a lot of differences between MustTest machines and the original Technic, far too many for me to document them all. If you have a question about something I missed in this writeup, don’t hesitate to send me an in-game email!
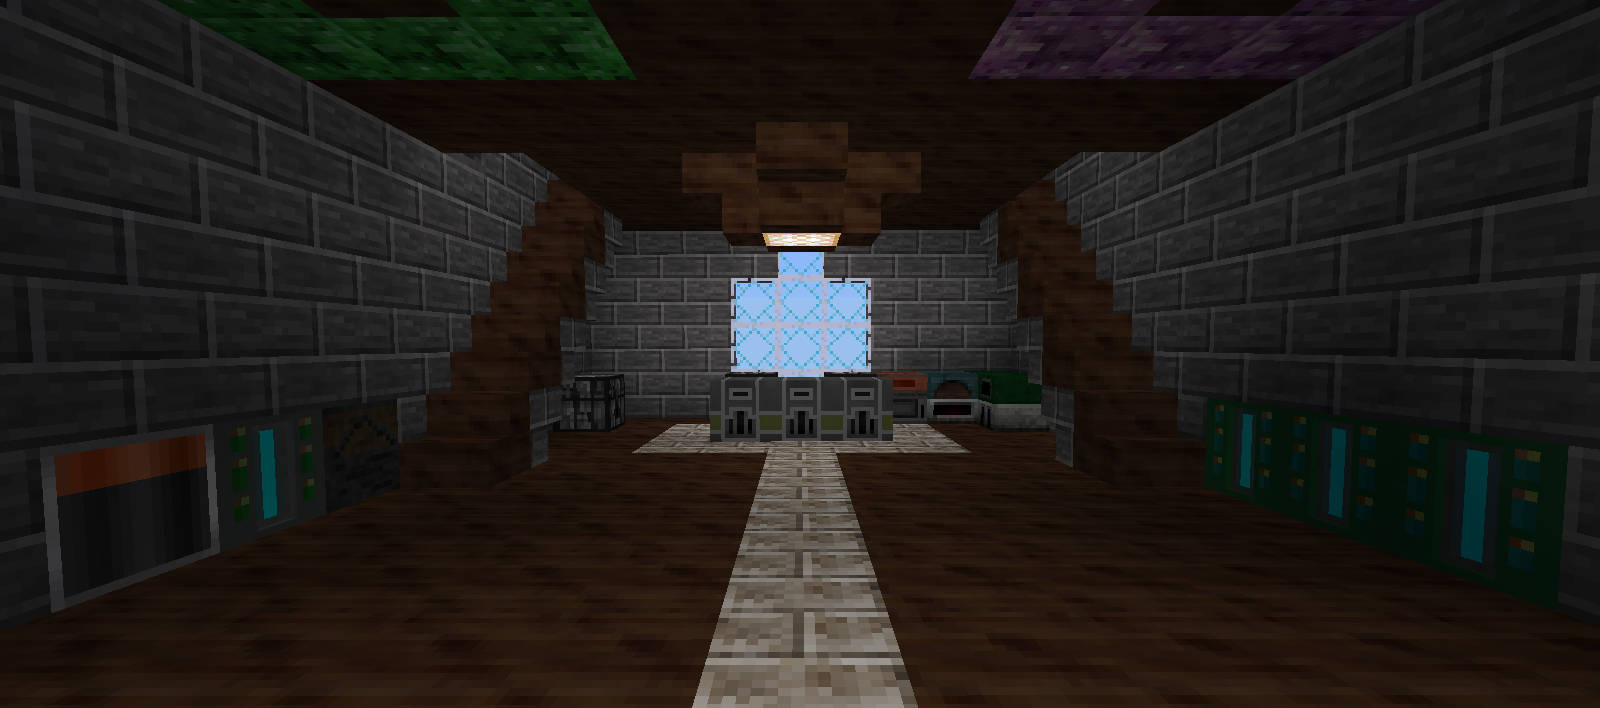
A Simple Machine Network
Here you can see an example of a simple machine network, nearly the simplest that you can build. A simpler version would use only one cable box and discard the black MV cable. You generate energy (sometimes referred to as EUs) by putting coal or mese into the fuel-fired generator, which burns it. Energy produced is sent to the battery box for storage.
You may notice that there is no switching station in this network. Unlike in the original Technic mod, you do not need them. Power-networks are completely decentralized.
All the components of a network are here: the battery box (to the right), the fuel-fired generator (above the cable box that is directly left of the battery box), and at least one “tool” machine (the extractor, above the cable box on the left). The two machines connected by the horizontal cable are the cable boxes.
Here is an example of the absolute simplest machine network you can build. One generator, one cable box, and one tool. Note the lack of any battery box. The generator itself actually acts as a low-capacity battery, and the tool (the extractor) can draw energy from it directly as long as the generator has energy in its EU buffer.
The simplest possible (MV) machine network. You need one cable box minimum, since the machines will not connect directly.
While a simple network like this is useful in a pinch, you should be aware that there will be quite a bit of wasted energy if you are not careful. In particular, since there is no battery box, any energy the generator produces beyond its buffer capacity will be wasted. The purpose of battery boxes in any network is to store excess energy produced by generators; without one, your power-network will suffer from the implementation’s idea of surges (excess energy wasted) and brownouts (no power available for tools).
Tidal EU Generator
This machine generates EUs (energy) from the tides in large bodies of water. Not surprisingly, this means that this machine will not work in any small pool. It is designed to be placed under the ice that covers the oceans near the city, where there are currents.
The machine needs to find at least 500 water nodes near it in order to function. In addition, the 4 sides of the machine must also be next to water. Please note that it is quite difficult to “trick” the machine into operating in a man-made pool, though it can be done.
A carefully built pool with nine turbines above sea level, designed and operated by Mikuden. Notice the generators located below the MV cable boxes. A man-made tide pool can be made to work well, but takes a lot of effort to set up. If you do decide to build a manual pool, pay attention to make sure there are no airgaps in the water below the machine. The machine does not like airgaps!
This machine produces 50 EU per second, and will buffer up to 1000 EU before sending power to batteries.
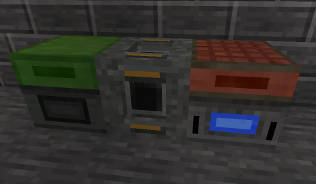
Machine Upgrades
Some machines have inventory slots where you can insert upgrade components. This describes the available upgrades.
Available machine upgrades. Unlocked chest, RE battery, and CLU.
An unlocked chest will alow the machine to be used by others, even while it is protected (of course, others cannot change the upgrade components).
An RE battery causes the machine to use less energy.
A CLU (Control Logic Unit) makes the machine work faster (at the expense of using more energy).
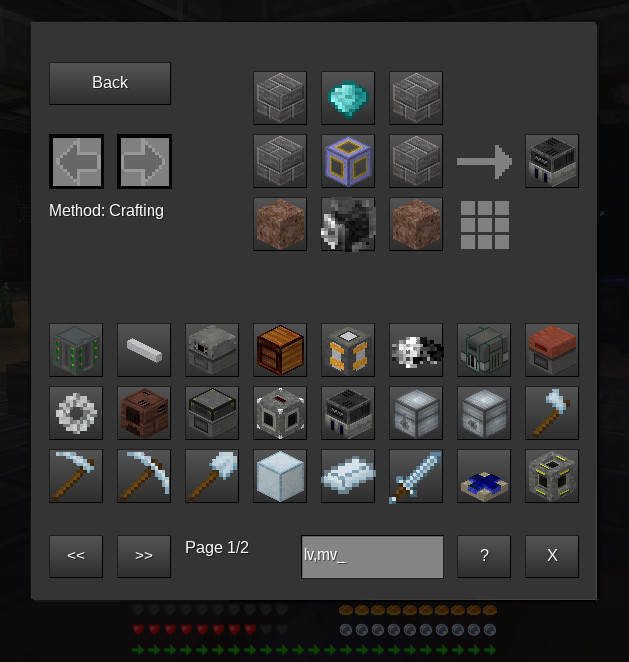
Craft Guide
The craft guide is part of your inventory formspec. To access it, open your inventory and click the life-ring button that is in the top-left corner. Once it is open, you can see the recipes for all items in the game that can be crafted. You won’t see items in the craft guide that are in the game, but which cannot be crafted. There are many such items.
The craft guide includes a search field at the bottom right. Click the ‘?’ button to initiate a search, and click the ‘X’ button to clear your search and go back to the main item listing. You can search multiple things at once by separating your searches with commas. For example, in the picture below, the craft guide is showing recipes for both LV and MV machines at once. When you search for something, both item names and item descriptions are all checked. A match in either of these will cause the matched item to appear in the search results.
Search terms are case-insensitive. “Tree” and “tree” return the same results.
Craft guide showing the recipe for the LV grinder, with the search results for “lv,mv”. You may wonder why the HV cable box appears in the list (it is in the bottom right corner). This is because its description includes the text “lv”. The same applies for the silver tools and other items that are not LV or MV machines.
You can only search items that are already in the craft guide and have recipes. Items in the game which have no craft recipes are not searchable.
There are multiple recipe types. The type of recipe is shown to the right of the 3x3 craft recipe table, underneath the arrow. The name of the recipe type is shown underneath the history buttons to the left. Many items have recipes that require machines to make them. Often an item has several recipes. You can see the different recipes by clicking the up and down buttons which are to the right of the recipe grid.
The next and previous page buttons will wrap around. If you are on the first page of an item listing and you press the back button, you’ll go to the last page. Likewise, if you are on the last page and you press the forward button, you’ll go to the first page.
Performing a search with the search field does not change your current page in the main item listing. Once you clear the search by pressing the ‘X’ button, you’ll go back to the page you were originally on.
Click ‘back’ to return to your inventory.
Flora Farming
The practice of growing grass and flowers on Must Test’s frozen landscape has several subtleties. The first thing every flora farmer should do before starting a farm is remove all sources of cold. Ice is sure to be a non-starter if it is anywhere near your plant roots. Once you have removed nearby ice and put down a layer of dirt or sod, you are good to go. Still, there are a few things you can do to improve things.
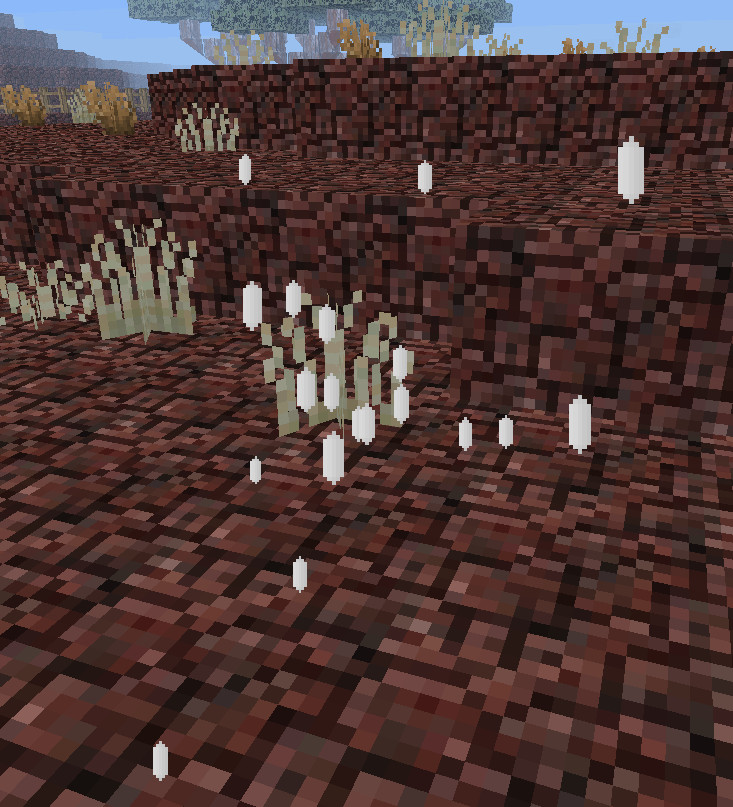
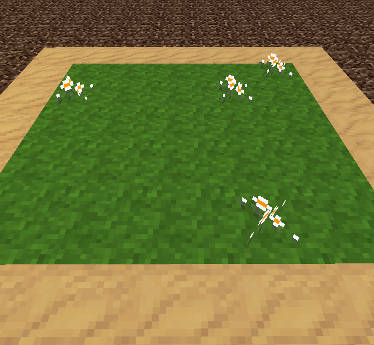
A basic dandelion farm.
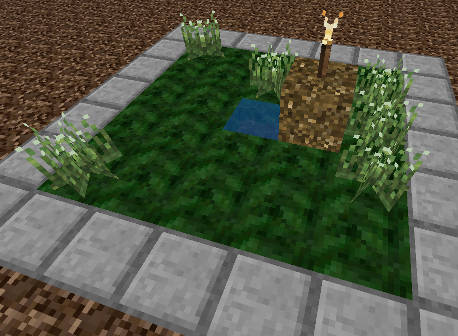
Lush grass can support a slightly higher flora density than other kinds of grass. Even if you haven’t been able to grow any lush grass, you can still make sure the plants have water. Temperatures are never great on the land surface, so a nearby torch is helpful to drive off frost. Minerals offer an extra boost.
This grass farmer knows what he is doing! Notice the water, mineral source, and heat source.
With the right gardening skills, it is possible to double the density of flora on the same plot of land. Make sure to thin the plot every so often in order to permit new growth, since plants will stop growing once they reach their maximum density. The truly efficient farmer will wish to use no more dirt than is actually necessary in a single plot.
Farming dandelions in the Nether with no mob defenses. This farmer is either very brave, or very stupid. Ouch!
By comparison, mushroom farming is much simpler. Remember that mushrooms do not like light! You can grow them on dirt, decaying tree, or even dauth sand. They’ll grow best in the Nether, where there is no sun. There are not many crops that can grow there, so mushrooms will be valuable if you plan to stay long.
The cultivation of “waterlilies” is similar to that of land plants, with the obvious difference that they only grow in water. Though the “waterlily” is the only plant originally native to this frozen world, it does not thrive in cold water. Despite this, the microscopic seeds of this plant are present nearly everywhere. Placing a heat source such as a torch near a quiet pool will cause the plant to grow to full, visible size, seemingly from nothing. This has caused many scientists to mistakenly believe the plant arises from spontaneous generation.
Growing Trees In Caverns
You can grow overworld trees underground in deep caverns, but it takes some effort. You might or might not find it useful. :-)
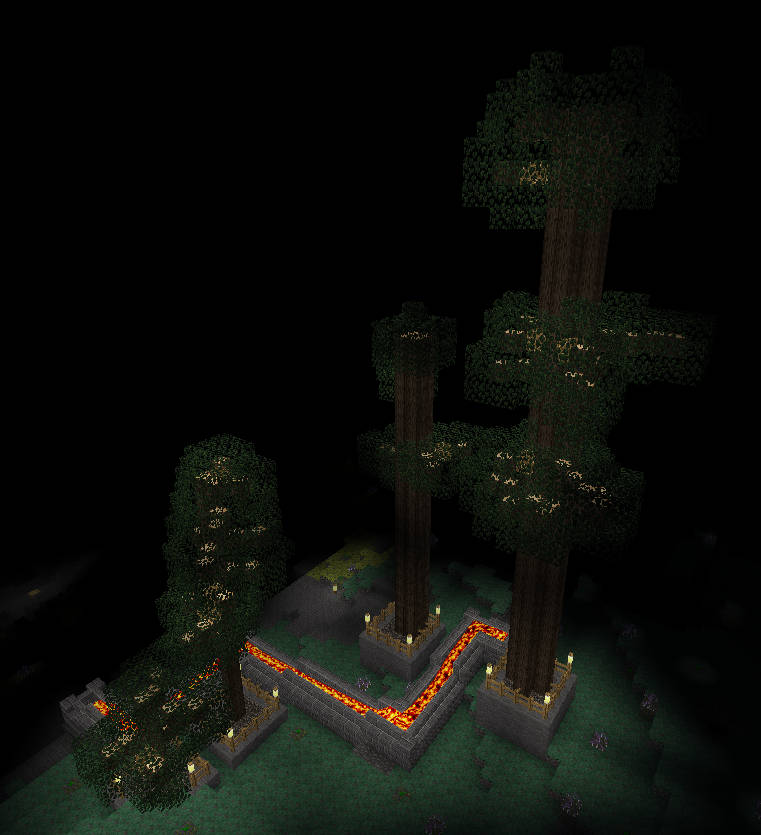
Here is how: find an open area underground (huge caverns are probably best), that is not close to the surface and has a high ceiling. Get glowing minerals and use them to make a ‘soil’ bed. Put a sapling on top. You’ll need to have lava nearby for light and heat to help the sapling to grow. Then wait, or use bonemeal if you’re impatient. When the tree grows, it drains all the glowing minerals out of its immediate environment and incorporates them into itself. These minerals continue to provide light to the leaves, so the tree can survive without need of the sun.
Self-illuminating trees.
The more minerals you provide for soil, the bigger the tree will grow.